How to Transcribe Voice Memos on Mac (3 Methods)
How to transcribe voice memos on Mac. Covers Apple's built-in Voice Memos transcription, MacWhisper for audio files, and how to skip the middleman entirely.
macOS Sequoia added automatic transcription to Voice Memos. If you have an M1 Mac or newer, you already have a free, on-device way to turn recordings into text. No third-party app required.
But the built-in feature has real constraints: it requires M1 hardware, only works in English, and handles audio you've already recorded — not live dictation. Depending on what you need, a different approach may work better.
This guide covers three options: Apple's built-in transcription, a dedicated file transcription app, and real-time dictation as an alternative to the record-then-transcribe workflow.
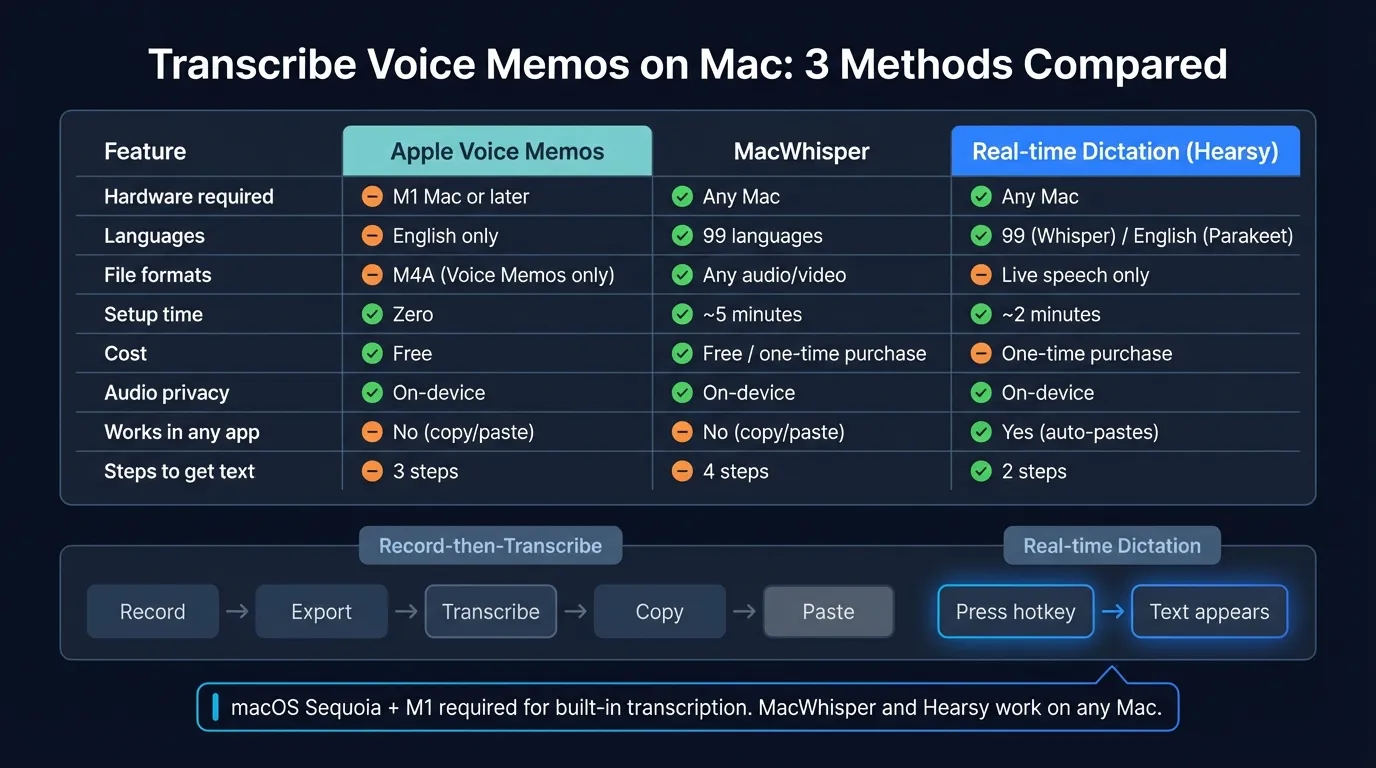
Here's how the three methods compare at a glance:
Method 1: Apple Voice Memos (macOS Sequoia)#
Voice Memos in macOS 15 Sequoia added automatic transcription powered by Apple's Neural Engine. If you qualify for the feature, it's the simplest option.
Requirements#
- Mac with M1 chip or later (older Intel Macs are not supported)
- macOS 15 Sequoia or later
- Language set to English (localized to US, UK, Canada, Australia, Ireland, New Zealand, or South Africa)
If you have a 2020 or later MacBook with Apple Silicon, you likely meet all three requirements.
How to transcribe a voice memo#
- Open the Voice Memos app (it's in your Applications folder, or search Spotlight)
- Select an existing recording, or tap the red button to record a new one
- Once the recording exists, click the Transcript tab in the detail panel on the right
- Voice Memos transcribes automatically — new recordings are transcribed as you speak; older recordings process within a few seconds
The transcript is searchable. You can click any word in the transcript to jump to that moment in the audio, which is useful for longer recordings.
What it doesn't do#
The feature is limited in a few ways worth knowing:
English only. The transcription feature is restricted to English variants. If you record in Spanish, French, German, or any other language, you won't get a transcript.
M1 required. If you have an Intel Mac from 2019 or earlier, the Transcript tab doesn't appear. The feature depends on the Neural Engine in Apple Silicon.
Voice Memos only. This works for recordings made inside the Voice Memos app. It doesn't transcribe arbitrary audio files from Finder or other apps — for that, you need a different tool.
No export options. You can select and copy the transcript text, but there's no one-click export to a document. You copy, then paste into whatever you need.
For recordings made inside Voice Memos on a qualifying Mac, this is the fastest path. Zero setup, free, and fully on-device. If your needs go beyond these constraints, the next option handles more file types.
Method 2: MacWhisper (for any audio file)#
MacWhisper is a macOS app that transcribes audio and video files by running OpenAI's Whisper model locally. You drag in a file — an M4A voice memo export, an MP3, a video recording, anything — and get a text transcript back.
Unlike Voice Memos transcription, MacWhisper isn't locked to M1 hardware, works in 99 languages, and accepts files from anywhere, not just recordings made inside a specific app.
How it works#
- Download MacWhisper from the Mac App Store or from Gumroad
- Open the app and drag your audio file onto the window — or use File > Open
- Select a Whisper model from the dropdown (more on this below)
- Click Transcribe
- Copy, export as TXT, or save as SRT (subtitles format)
The free version gives you access to the Tiny, Base, and Small Whisper models. These are fast and accurate enough for clear speech in good recording conditions. The Pro license ($69 one-time) unlocks Medium, Large-V2, Large-V3, and Large-V3 Turbo — the higher-accuracy models that handle background noise, accents, and dense technical vocabulary better.
Which model to pick#
| Model | Speed | Accuracy | Best for |
|---|---|---|---|
| Tiny | Very fast | Basic | Quick notes, clean audio |
| Base | Fast | Good | General use (free tier) |
| Small | Moderate | Better | Standard recordings |
| Large-V3 Turbo | Moderate | High | Noisy audio, accents, multilingual |
For a voice memo recorded on your phone in a quiet environment, Small is usually enough. For an interview or meeting recording with multiple speakers and background noise, Large-V3 Turbo is worth the Pro upgrade.
How to get your Voice Memo audio into MacWhisper#
Voice Memos stores recordings as M4A files. To export one:
- Right-click the recording in Voice Memos
- Choose Share > Save to Files (or drag to Finder)
- The file saves as an M4A — drag it directly into MacWhisper
MacWhisper supports M4A, MP3, WAV, FLAC, MP4, MOV, and most other common audio and video formats.
What it doesn't do#
MacWhisper is a file transcription app. It processes recordings that already exist. If you want to speak something now and have it appear as text in your current app, that's a different workflow covered in the next section.
Continue reading
Dictate into Any App on Mac
Gmail, Slack, Word, Notion — Hearsy works everywhere. Just press a key and speak.
Method 3: Skip the voice memo entirely#
The two methods above share a structural limitation: you record first, then transcribe later, then copy the text into wherever you actually need it.
This works fine for meeting recordings or interviews you need to reference. But for most writing — emails, documents, notes, Slack messages — you're adding two steps to a process that doesn't need them.
Record voice memo → export → drag to transcription app → wait → copy transcript → paste into document
The direct path is simpler:
Press hotkey → speak → text appears in your document
Hearsy is a system-wide dictation app that works this way. Press a hotkey in any Mac app, speak, and the transcription pastes directly into whatever window is active. There's no recording file, no export step, and nothing to clean up afterward.
How real-time dictation compares#
| Voice Memos + transcription | Real-time dictation | |
|---|---|---|
| Workflow | Record → export → transcribe → copy → paste | Press hotkey → speak → done |
| Steps | 5+ | 2 |
| Works in any app | No (copy/paste required) | Yes |
| Language support | English only (Voice Memos) | 99 languages (Whisper) or English (Parakeet) |
| Best for | Existing recordings, meetings, interviews | Writing emails, docs, notes in real time |
Real-time dictation makes the most sense for content you're creating now: an email reply, a Notion note, a document draft. File transcription makes sense for existing recordings you need text versions of — meeting recordings, interview audio, voice memos you took on your phone.
Setting up Hearsy for dictation#
- Download and install Hearsy
- Grant Microphone and Accessibility permissions when prompted
- Set a hotkey in settings (
Option + Spaceis common)
The Accessibility permission is required because Hearsy pastes via Cmd+V into whatever app is active. That's what lets it work in Gmail, Notion, VS Code, Terminal, or any other app.
Hearsy uses two local models:
- Parakeet — English only, under 50ms latency on Apple Silicon. For fast, responsive everyday dictation.
- Whisper Large V3 — 99 languages, 1-2 seconds processing time after you stop speaking. Better for technical vocabulary or non-English content.
Both process entirely on your Mac. Nothing is uploaded.
For more on choosing between these engines, see the Whisper vs Parakeet comparison.
Which method to use#
Use Apple Voice Memos transcription if:
- You have an M1 Mac running macOS Sequoia
- You're transcribing recordings already in Voice Memos
- You dictate in English
- You want zero setup and free
Use MacWhisper if:
- You have audio files from any source (not just Voice Memos)
- You need language support beyond English
- You have an older Intel Mac
- You want export options (TXT, SRT)
Use real-time dictation if:
- You're writing content now rather than transcribing existing recordings
- You work across multiple apps and want one consistent workflow
- You want text to appear directly in your document without a copy-paste step
Most people who regularly record voice memos to capture ideas end up doing more dictation once they try real-time dictation. The friction of the record-then-transcribe workflow becomes obvious once you see the alternative.
Tips for better transcription results#
Record in a quiet space. Background noise is the biggest source of transcription errors. Even Whisper Large V3 degrades significantly in a noisy café. A quiet room or using earbuds with a microphone helps.
Speak at a consistent pace. Both Whisper and Apple's model handle normal speech rhythm well. Very fast speech and very slow speech both increase errors. Speak at a natural presentation pace.
Don't stop and restart frequently. Short, choppy recordings lose context between sentences. For voice memos you intend to transcribe, record in longer unbroken stretches when possible.
Use Whisper for technical vocabulary. Apple Voice Memos transcription handles general English well but struggles with product names, acronyms, and jargon. For technical content, MacWhisper with Large-V3 Turbo handles these better.
Export the text right away. Transcripts sitting in Voice Memos don't do much. Copy the transcript immediately and move it into your notes app or document. MacWhisper lets you export directly to a file.
For related workflows, see the Mac voice typing guide, the convert audio to text on Mac guide, and the Mac dictation guide.
Frequently asked questions#
How do I transcribe voice memos on Mac?#
On macOS Sequoia with an M1 Mac, open Voice Memos and click the Transcript tab on any recording. The app transcribes automatically. For other audio files, MacWhisper accepts any audio format and runs Whisper locally.
Does Apple Voice Memos automatically transcribe recordings?#
Yes, starting with macOS 15 Sequoia. The feature requires an M1 chip or newer and is currently limited to English. Open Voice Memos, select a recording, and click the Transcript tab — older recordings are processed automatically when you open them.
What is the best free app to transcribe voice memos on Mac?#
Apple Voice Memos (macOS Sequoia, M1 required) is free and works automatically for English recordings. MacWhisper's free tier supports Tiny, Base, and Small Whisper models at no cost. Both process audio locally.
Can I transcribe a voice memo without uploading it to the cloud?#
Yes. Apple Voice Memos transcription runs on your Mac using the Neural Engine — nothing is uploaded. MacWhisper also processes entirely locally. Neither requires an internet connection to transcribe.
Is there a faster alternative to recording a voice memo and then transcribing it?#
Yes. System-wide dictation apps like Hearsy skip the record-then-transcribe workflow by transcribing in real time and pasting text directly into any app. Press a hotkey, speak, and your words appear in whatever you're working in — no file, no export, no copy-paste.
Ready to Try Voice Dictation?
Hearsy is free to download. No signup, no credit card. Just install and start dictating.
Download Hearsy for MacmacOS 14+ · Apple Silicon · Free tier available
Related Articles
Dictate Emails in Gmail on Mac: Step-by-Step Guide
11 min read
Voice to Text in Microsoft Word on Mac: 3 Ways That Actually Work
11 min read
Best Voice Recorder Apps for Mac (with Transcription)
8 min read
Best Voice Note-Taking Apps for Mac in 2026
10 min read
Voice Journaling on Mac: Best Apps and Workflows
10 min read