Voice Journaling on Mac: Best Apps and Workflows
How to set up voice journaling on Mac using Day One, Obsidian, or Apple Notes. Covers real-time dictation, AI cleanup, and why it beats recording then transcribing.
Most people who try voice journaling quit within a week — not because they dislike it, but because the workflow is too clunky. Record a memo, export it, drag it to a transcription app, wait, copy the text, paste it into a journal entry. By step three, the moment is gone.
The simpler approach: press a hotkey, speak, and the transcription appears directly inside your journaling app. No audio files, no export steps, nothing to clean up afterward.
This guide covers how to set up voice journaling on Mac — which apps work well, how to connect them to dictation, and how AI cleanup turns stream-of-consciousness speech into readable entries.
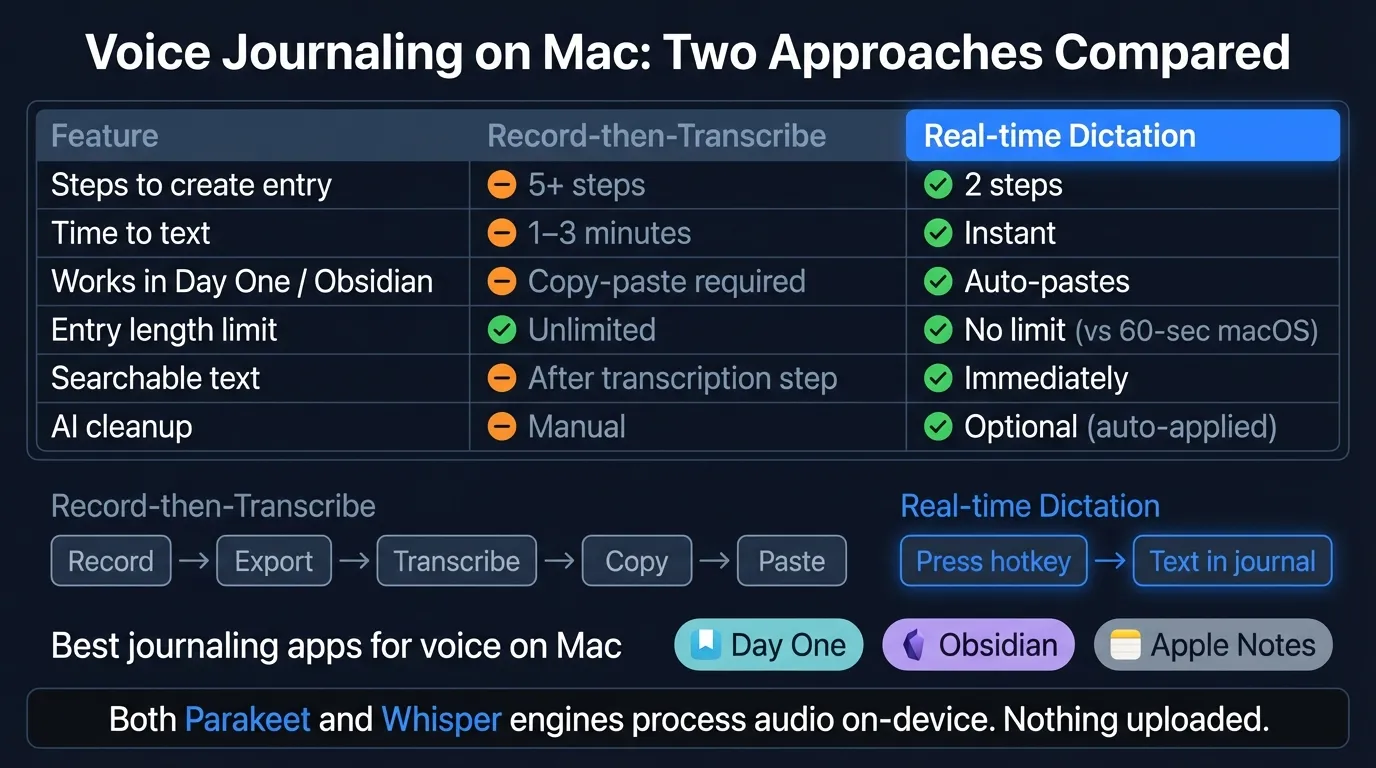
Here's an overview of the voice journaling workflow and app options on Mac:
Why voice journaling works#
Typing is slow. The average person types around 40 words per minute but speaks at 130 words per minute or faster. For journaling — where the goal is capturing thoughts as they happen — that gap matters. Spoken entries tend to be longer and more candid because there's less friction between thinking and recording.
The research on journaling in general is solid. A 2022 meta-analysis published in Frontiers in Psychiatry (PMC8935176) reviewed 20 randomized controlled trials and found that journaling produced a statistically significant 9% reduction in anxiety symptoms and 6% reduction in PTSD symptoms compared with control groups. The research covers written journaling, but the mechanism — articulating thoughts in a structured way — applies to voice as well.
The one trade-off: spoken entries are messier. Filler words, run-on sentences, repeated phrases. That's where AI post-processing helps, which I'll cover below.
The two approaches to voice journaling on Mac#
Option 1: Record, then transcribe#
This is what most people try first. Record a voice memo in the Voice Memos app or on your phone, then use a transcription app to convert it to text.
It works. If you're reviewing old recordings or want to keep the audio alongside the text, it makes sense. But the workflow has real friction:
Record → export → drag to transcription app → wait → copy → paste into journal
That's five steps after you finish speaking. For a quick emotional check-in or a daily reflection, that overhead often means skipping the entry entirely.
For more on this workflow, see the guide to transcribing voice memos on Mac.
Option 2: Real-time dictation (recommended)#
A system-wide dictation app listens to whichever app is in focus and pastes transcribed text directly at the cursor.
Click into journal entry → press hotkey → speak → stop → done
Two active steps. The text is already in your journal by the time you finish speaking. For daily journaling — where consistency matters more than perfection — this is the approach that sticks.
App-by-app setup#
Day One#
Day One is purpose-built for journaling. It has timelines, location tags, photos, end-to-end encryption, and dedicated iOS and macOS apps. It's the most feature-complete option for anyone who wants a real journaling experience rather than a text file.
On Mac, Day One supports voice dictation through macOS's built-in system. To use it:
- Open Day One and create a new entry
- Click inside the entry text area
- Press Control twice (the default macOS dictation shortcut) — or your custom hotkey if you've set one
- Speak your entry
- Pause or press the shortcut again to stop
The built-in macOS dictation works fine for entries under 60 seconds. For longer entries — a 5-minute morning reflection or a detailed weekly review — the macOS time limit interrupts you mid-sentence. A system-wide dictation app removes that constraint. Set your hotkey once in the app's preferences, then use it inside Day One the same way you'd use any other shortcut.
Day One also supports audio attachments: you can drag an M4A file directly into an entry. But text entries are searchable and easier to review. Dictated text in Day One is just as searchable as typed text.
Day One pricing: Free tier available; Day One Premium is $34.99/year or $3.99/month (as of March 2026).
Obsidian#
Obsidian stores everything as plain Markdown files on your Mac. For people who want their journal in a format they fully own, with no subscription and no vendor lock-in, it's the obvious choice.
Obsidian has no built-in voice input. You use macOS system dictation or a third-party app. The workflow:
- Open your daily note (the Daily Notes plugin in Obsidian creates these automatically)
- Click into the note where you want to type
- Activate dictation with your hotkey
- Speak
- Transcription pastes directly into the Markdown file
Because Obsidian is just files, you can use Spotlight or Obsidian's own search to find anything you've ever dictated. Every journal entry is a .md file sitting in your vault folder.
For writers or developers who already live in Obsidian, adding voice journaling is a hotkey setup away. No new app, no new subscription.
Apple Notes#
Apple Notes is the lowest-friction option — it's already installed, syncs via iCloud, and works across all Apple devices. It isn't purpose-built for journaling, but it handles the job adequately.
The same approach applies: click into a note, activate dictation, speak. Apple Notes renders basic formatting (headers, lists) and the search is fast.
One advantage for journaling: on macOS Sequoia with an M1 Mac, Apple Notes uses on-device voice recognition for short dictation sessions — nothing goes to a server. The built-in dictation has a time limit and doesn't clean up filler words, so longer journal entries benefit from a dedicated dictation app.
For using Hearsy with Apple Notes specifically, see our Apple Notes workflow guide.
Continue reading
Dictate into Any App on Mac
Gmail, Slack, Word, Notion — Hearsy works everywhere. Just press a key and speak.
Setting up real-time dictation#
Hearsy sits in the Mac menu bar and works in any app — Day One, Obsidian, Apple Notes, or anything else. The setup:
- Download and install Hearsy
- Grant Microphone and Accessibility permissions when prompted (Accessibility is required to paste into other apps)
- Set your hotkey in preferences —
Option + Spaceis a common choice - Open your journaling app, click into an entry, press the hotkey, speak, press again to stop
Hearsy uses two on-device speech models:
- Parakeet — English only, under 50ms latency on Apple Silicon. Good for fast, responsive everyday journaling.
- Whisper Large V3 — 99 languages, about 1-2 seconds processing time. Better for non-English content or heavy technical vocabulary.
Both models run locally. Nothing is uploaded.
There's no time limit. Speak for 30 seconds or 10 minutes — the session doesn't cut off.
Turning a spoken draft into a readable entry#
Spoken language is different from written language. You say "um" and "like" and repeat yourself and trail off mid-sentence. That's normal and expected in a voice journal — the value is in the content, not the polish.
For private reflections, raw transcription is usually fine. Most people aren't re-reading every word; they're scanning for themes or looking up a specific memory from six months ago.
But if you want journal entries you'd actually enjoy rereading, Hearsy's AI enhancement can clean them up before pasting. The General cleanup template removes filler words, fixes punctuation, and adds paragraph breaks where you paused naturally. It runs in about 1-2 seconds after you stop speaking.
Here's what that looks like in practice:
You speak: "So today was, um, really hard actually, I had this meeting and it kind of went sideways and I'm not totally sure what to do about it, I guess I need to talk to Sarah but I'm kind of dreading it, you know, because last time..."
After cleanup: "Today was hard. A meeting went sideways and I'm not sure how to handle it. I need to talk to Sarah, but I'm dreading it — last time..."
The content is unchanged. The register shifts from spoken to written. You decide what to keep.
You can choose whether to use cleanup or not on a per-entry basis. Some people prefer the raw transcription as a record of exactly how they were thinking. Others want polished entries from the start.
Tips for better voice journal sessions#
Pick a consistent time. Morning works well because you haven't mentally edited the previous day yet. Evening works for reflection. The specific time matters less than doing it at the same time — consistency builds the habit faster than any app feature.
Speak in a quiet space. Background noise is the biggest source of transcription errors. A quiet room or earbuds with a microphone makes a bigger difference than model choice.
Don't self-edit while speaking. The goal is capture, not polish. Let thoughts run. If you mispronounce something or lose the thread, keep going. You can clean it up afterward, or just leave it.
Use a prompt if you're stuck. "What happened today?" is enough. Specific prompts — "What did I avoid? What worked? What am I grateful for?" — help if you blank out.
Set a minimum, not a maximum. Committing to two minutes of speaking daily is more sustainable than committing to a full entry. Most sessions run longer once you start.
Related guides#
For the broader dictation workflow on Mac, see the Mac voice typing guide, the productivity dictation overview, and the voice dictation for writers guide. For comparing dictation engines, see Whisper vs Parakeet.
Frequently asked questions#
What is the best voice journaling app for Mac?#
Day One is the most complete journaling app for Mac and supports macOS voice dictation. For plain-text journaling with full file ownership, Obsidian paired with a system-wide dictation app works well. Apple Notes is the zero-setup option. All three work with a hotkey-based dictation app for sessions longer than 60 seconds.
How do I voice journal on Mac?#
Click into your journaling app (Day One, Obsidian, Apple Notes, or any text editor), press your dictation hotkey, speak your entry, then stop. With a system-wide dictation app, the transcription pastes directly into the entry — no exporting, no copy-paste. Enable AI cleanup to convert the spoken draft into polished text before it pastes.
Can I dictate into Day One on Mac?#
Yes. Day One on Mac supports macOS system dictation — click inside an entry, press Control twice, and speak. For entries longer than 60 seconds, the built-in macOS dictation cuts off. A third-party dictation app removes that limit and adds optional AI cleanup.
Is voice journaling as effective as written journaling?#
Research supports the benefits of journaling regardless of format. A 2022 meta-analysis published in Frontiers in Psychiatry found journaling reduced anxiety symptoms by 9% compared to control groups. The proposed mechanism — organizing and articulating thoughts — works whether you're typing or speaking. Voice removes the typing barrier that stops many people from journaling consistently.
What is the difference between a voice memo journal and voice journaling?#
A voice memo journal stores audio recordings you listen back to. Voice journaling converts speech to searchable, editable text stored inside a journaling app. Text is easier to search, review, and share. Real-time dictation produces text entries directly without a separate transcription step.
Ready to Try Voice Dictation?
Hearsy is free to download. No signup, no credit card. Just install and start dictating.
Download Hearsy for MacmacOS 14+ · Apple Silicon · Free tier available
Related Articles
Dictate Emails in Gmail on Mac: Step-by-Step Guide
11 min read
Voice to Text in Microsoft Word on Mac: 3 Ways That Actually Work
11 min read
Best Voice Recorder Apps for Mac (with Transcription)
8 min read
Best Voice Note-Taking Apps for Mac in 2026
10 min read
Voice Dictation for Writers: Write Faster, Edit Less
14 min read